


Introduction
Pi-Hole is a network-wide Ad Blocking based on a DNS filter. It can also act as a DHCP server.

Pi-Hole Installation
Method: 1 (Auto)
Run the following script
wget -qO- https://raw.githubusercontent.com/akkupy/Homelab/main/scripts/install_pi_hole.sh | bash
Method: 2 (Manual)
Folder Setup Script
The first thing we need to do is set up the folder structure.
Run the following script :
wget -qO- https://raw.githubusercontent.com/akkupy/Homelab/main/scripts/pi_hole_dir.sh | sudo bashNow we need to move into that directory using the following:
cd /home/$USER/pi_holeWe now need to open the docker-compose.yml file using the nano editor.
nano docker-compose.ymlCopy and paste the below Docker-compose example into the docker-compose.yml file.
💡NOTE: Change the TimeZone and Conflicting ports according to your needs.See the example below: Docker-compose example:
  version: "3"

  # More info at https://github.com/pi-hole/docker-pi-hole/ and https://docs.pi-hole.net/
  services:
    pihole:
      container_name: pihole
      image: pihole/pihole:latest
      # For DHCP it is recommended to remove these ports and instead add: network_mode: "host"
      ports:
        - "53:53/tcp"
        - "53:53/udp"
        - "67:67/udp" # Only required if you are using Pi-hole as your DHCP server
        - "4000:80/tcp"
      environment:
        TZ: 'America/Chicago'
        # WEBPASSWORD: 'set a secure password here or it will be random'
      # Volumes store your data between container upgrades
      volumes:
        - './etc-pihole:/etc/pihole'
        - './etc-dnsmasq.d:/etc/dnsmasq.d'
      #   https://github.com/pi-hole/docker-pi-hole#note-on-capabilities
      cap_add:
        - NET_ADMIN # Required if you are using Pi-hole as your DHCP server, else not needed
      restart: unless-stopped
Once you have done that press “Ctrl + X” then Y to save and “Enter” to exit the nano editor.
To deploy the dockers run the following command:
sudo docker-compose up -dThis will take some time to finish.
Once complete you can check that the docker containers exist by typing the following:
sudo docker psOr you can check in Portainer by logging in via your browser and navigating to “Containers“.
If you see any problems like “unhealthy” Please restart the container and all should be well.
Post Installation
Admin Password
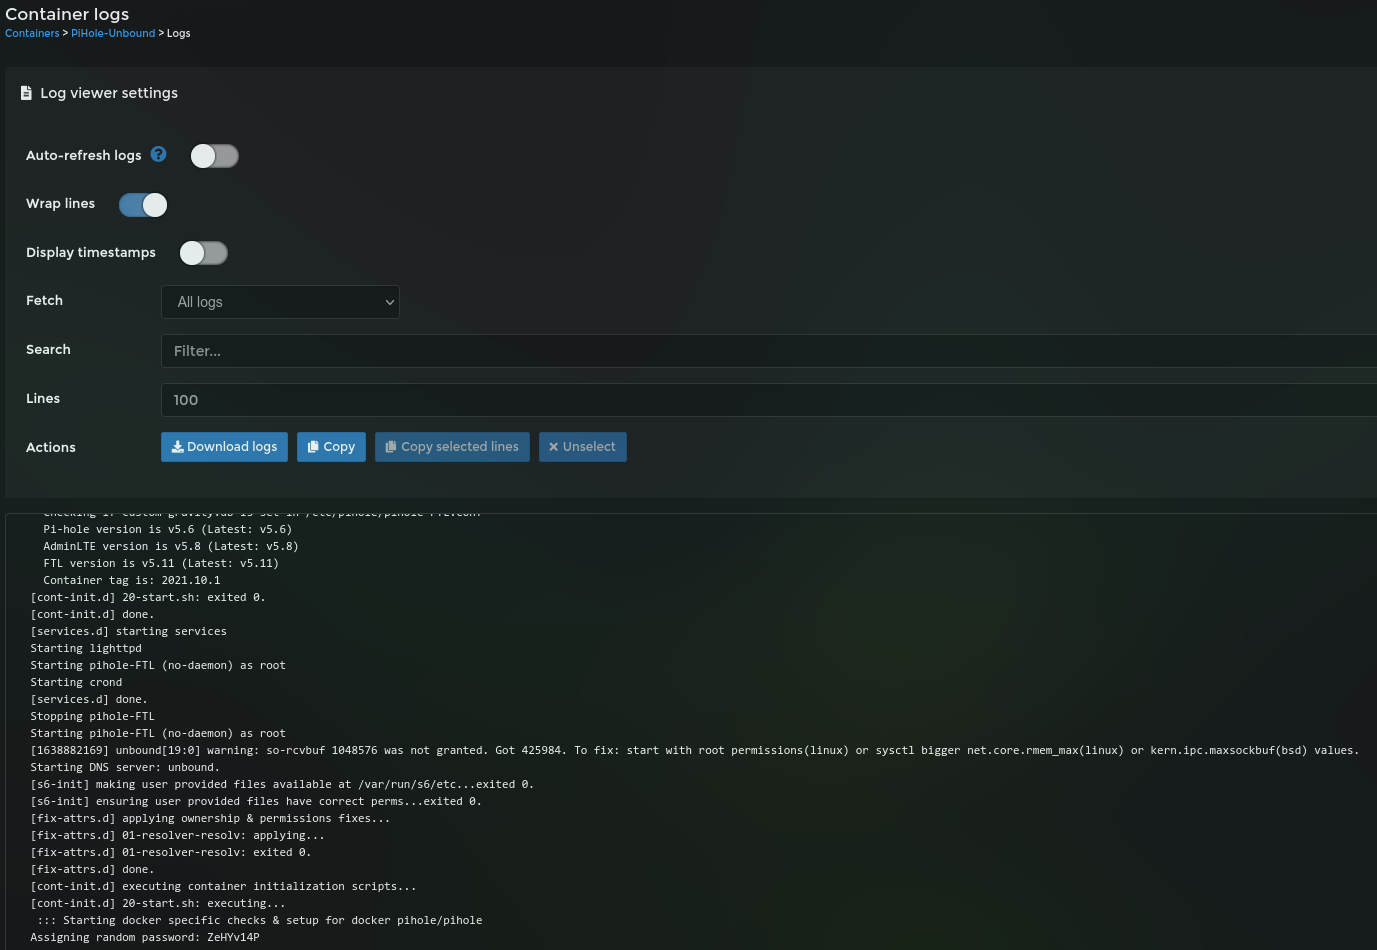
Once deployed, open the container logs, disable Auto-refresh logs so you can scroll freely and look for Assigning random password: XXXXXXXX to get the Admin password.
You can set a new password by opening the Console through Portainer and typing pihole -a -p and entering the password when requested.
You can find more commands to run here.
With the admin password, go to http://<Raspberry IP>:4000/admin to access the Pi-Hole web interface and log in.
(Optional): Configure Reverse Proxy using the documentation here
Change the DNS settings Interface listening behaviour to "Listen on all interfaces, permit all origins", if using Docker's default bridge network setting. (This can also be achieved by setting the environment variable DNSMASQ_LISTENING to all)
Setting Mainstream DNS
Go to Settings and select DNS on top.
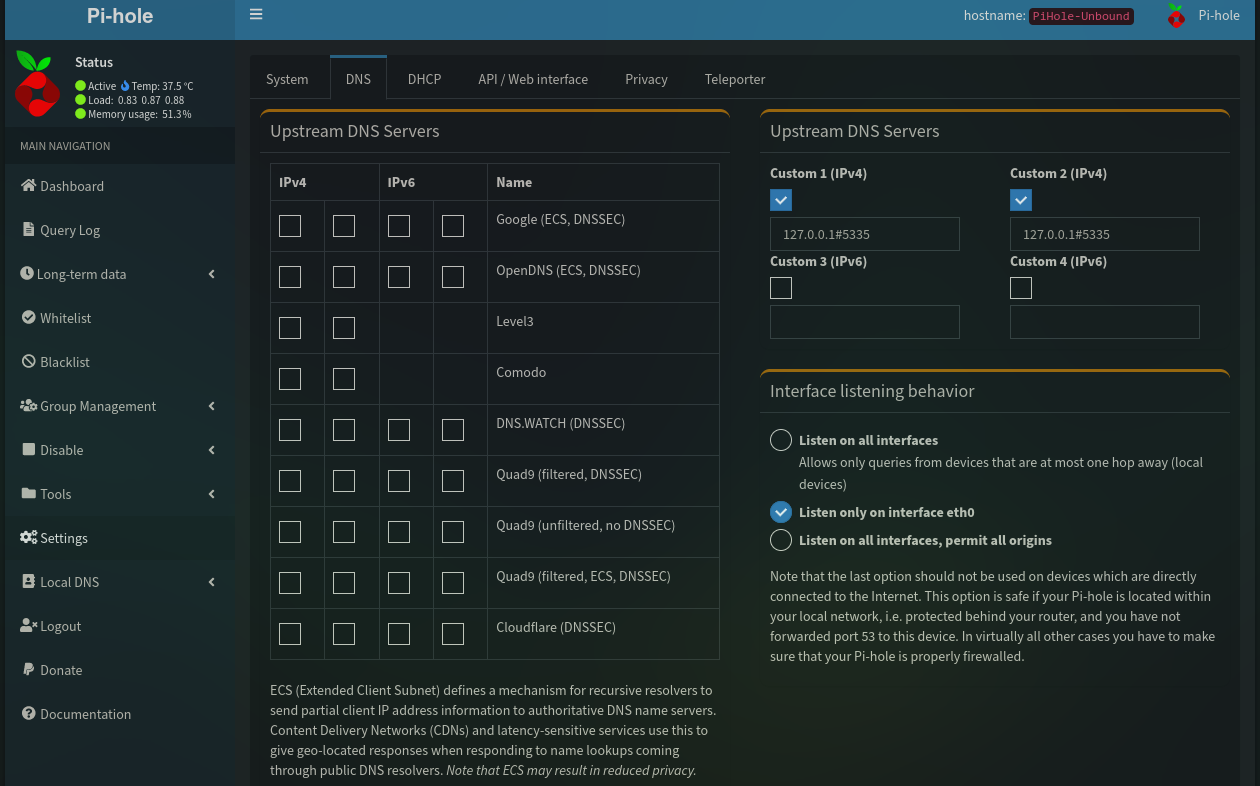
On the left-hand side, you can select any one of the known DNS providers or insert a custom one on the right-hand side.
You can also set Use Conditional Forwarding for the Pi-Hole to ask your DHCP server for the hostname of the local IPs. For this to work, define your local network CIDR (I've used 192.168.0.0/16 that covers all possible subnets within 192.168.x.x range), then insert the IP of your DHCP server (normally your router) and optionally a local domain name.

If you're having loop issues with your router, then you might want to disable this option.
Point your router or device to Pi-Hole
As each router is different to configure, I'm not going to detail here how it's done. However, you can point your router DNS to Pi-Hole IP (Raspberry IP) and it will use it as the main DNS, blocking any request included on its blacklist.
Optionally, you can set each device to use a custom DNS and insert the IP of your Raspberry.
You can also refer to the pi-hole router setup documentation for more information.
Adding more Ad lists
You can add more lists through Group Management -> Adlists. Then just add the list you want to use.
You can visit The Big Blocklist Collection if you want to add more.